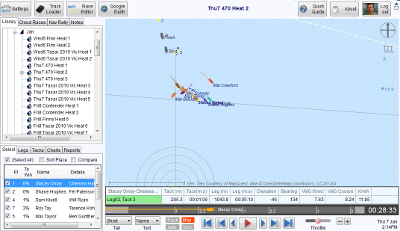
TackTracker's race player is a powerful visualisation tool for yacht racing. The simple, clear graphics bring the race to life and convey exactly what you need to know.
Each track is is represented by a boat graphic of the a particular color. You can choose the color in the Select tab. The boat may have a trailing "tail" of type selected in the bottom control bar. For example, the "Long" tail will extend to the beginning of the current leg.
Each boat represents the location in its track at the current time, which is indicated by the clock at the bottom right of the screen.
The width of the side pane on the left may be adjusted by dragging the splitter control along the right hand edge of the pane. On the PC version, you can hide the pane by dragging the splitter towards the far left. The pane will be hidden and a "Show Pane" button will appear at the lower left of the map. Click "Show Pane" to restore the pane to view.
Using the Track Player
At any time, one of the boats is the selected or current boat - as highlighted in the Select tab. Select the boat you wish to watch in the select tab to make it the current boat.
The statistics table shows the speeds, distances and bearings for the current boat. You can move the current boat in several ways, the principal way being the navigation buttons:

• Navigate back by Leg, Tack and Point
• Navigate ahead by Point, Tack and Leg.
Click the red Play button  to start the player. Press again to stop. You can speed up and slow down the action by sliding the throttle control to the left of the play button.
Keyboard Shortcuts are available for common operations:
Spacebar toggle pause and play
Period "." step back one track point
Comma "," step forward one track point
"+" and "-" zoom in and out
TimeLine Bar
As you navigate using the buttons, you will see the current boat move along the TimeLine bar.

The TimeLine bar offers a convenient way to navigate the boat. Just click or drag with the left mouse button.
• The Letters or numbers on the TimeLine represent the mark roundings.
• The light shaded areas are the periods before the Start and after the Finish.
• The clock to the right of the Timeline is the elapsed time since the start.
Throttle Control
Underneath the TimeLine is a throttle control.
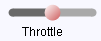
Drag the red circle to the right to move the time forward. Drag the circle to the left to reverse back. The further you drag the circle from the center, the faster the boats go.
When the race is playing (by pressing the red triangle Play button), the throttle control becomes a play speed control:

Changing the Track Play
At the bottom of the screen are several controls that you can use to customize the race play:

Control |
Purpose |
Track |
Track the current boat by keeping it in the center of the display. |
Auto |
Automatically pan and zoom during the race replay. This feature is designed for unattended replays - such as on a large screen at the bar. • Rotate so the line of the first beat is directly up the screen. • Zoom in on the start line at the start. • Track the top third of the fleet and zoom accordingly • Zoom in and linger at mark roundings • Slow down around marks and at the start and finish. You can configure the Auto mode replay speeds in the Settings dialog. |
Map |
Show / hide the map display |
Sat |
Display a satellite aerial view instead of a map. (Currently only available at normal zoom levels for locations in the USA) |
No Tail Short Leader
|
Various options for the tail and leader lines indicating the path travelled by each boat. No Tail: Only the boats are displayed Short Tail: A short tail or "worm" trail is displayed Short Leader: A short tail and a leader trail are displayed Long Tail: The tail extends back to the start of the leg. Full Path: A grey leader also shows the path to the next mark.
|
No Text |
No Text: No boat names are displayed Note: You can select the VMG and speed units in the Settings dialog. (Click the Settings button on the top left of the window.) Note: You can also see a boats current VMG and speed by hovering your mouse over any boat. |
Viewing Rotation and Wind Direction
At the top right corner of the track player are two indicators:
• A compass rose showing the view orientation. The arrow points North, which by default will be straight up.
• An estimated wind direction. This will not show if the wind direction could not be determined.
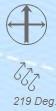
Rotating the View
You can rotate the track by clicking on the compass rose with the Left mouse button, and dragging the mouse in an arc within the circle. The North Arrow will point to the location of the mouse. Release the mouse button whilst the mouse is inside the circle to keep the new orientation.
Adjusting the Wind Direction
The prevailing wind direction is estimated by the software and appears under the compass rose. You can override TackTracker's estimate and build your own wind profile for the event.
Adjusting the wind direction is important if you wish to use TackTracker's VMG to Wind measurements. Also, upwind legs, a line is drawn perpendicular to the wind direction across the current boat in the fleet. You can use this line as a guide to determine who is in front and behind the current boat across the course. But it is only useful if the Wind direction is correct.
You have two options for entering wind data into TackTracker:
1. Manually enter wind directions in the Track plot window
2. Enter data sourced externally. See Wind Data
To manually enter a wind direction, click on the wind indicator and wind controls will appear in the plot window:
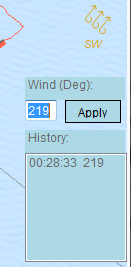
As with the Compass rose, you can adjust the wind direction by clicking on the wind icon and rotating it with the mouse. Alternatively, you can type the bearing in the text box.
When you are happy with your wind change, click Apply. Your new wind direction will take effect from the current time onwards in the playback.
You can change the direction multiple times during the race to build a profile. Each change is recorded in the History box.
You can click on the items in the History to navigate to that point in time. You can also delete the wind change if desired.
When a track is first displayed, it is zoomed so that it just fits the window. You can use the distance meter to get an understanding of the scale. Activate the distance meter by clicking mouse button 1. Then move it across the screen to make a ruler. Click again to turn it off.

To Zoom in and out, you can use the slider bar:
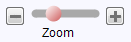
The slider bar zooms in and out about the center point of the screen. You may therefore first need to drag the point of interest to the center. Dragging is discussed below.
Alternatively you may click on the '+ or '-' symbols to zoom in and out, respectively.
Most people will find it more convenient to zoom using the mouse wheel. The mouse wheel zooms in and out about the center of the plot window.
When you zoom fully out, the track will revert to the initial "fitted" position. If required, you can zoom out further by clicking on the '-' symbol to the left of the slider bar.
To pan or drag the image across the screen, hold down either mouse button whilst you move the mouse. The image will move as if it were glued to the mouse.
Note: If you have selected the Track or Auto modes, the system may automatically pan back to where it was after you release the mouse button. This is intended behavior.
Summary of Mouse Controls:
Mouse Control |
Purpose |
Button 1 (usually the left button) |
Hold and drag to pan image. Click once for distance ruler or to lay marks.
Double click to move to center. |
Button 2 |
Pan image |
Scroll Wheel |
Zoom image |
Fullscreen Mode:
When viewing on a large screen, you may wish to switch to Fullscreen mode (PC only). Click the  icon at the top right corner of the screen to remove the window border and maximize your screen area.
The top tab group will be hidden. Additionally, you may drag the slider bar entirely to the left to maximise the plot area.
To exit full screen mode, click: 
Go to Task Selection