 Web Record
Setting up your QStarz Loggers
Your QStarz BL-1000ST or BT-Q1000XT loggers are simple and reliable devices to use. To get started, there are a few things you need to do:
Get Ready
Charge it up
The trackers charge through their USB port - and any standard 5V USB charger may be used. The most convenient solution is a multi-port USB wall charger, which are readily available from most electronic stores.
First time charging will take around 3 hours and the devices will operate for about 40 continuous hours between charges. We recommend giving the devices a charge before any important event.
Install a USB serial driver (if needed)
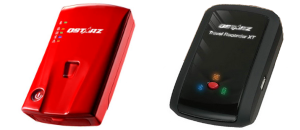
For serial USB devices such as the BT-Q1000XT or QR-1100P, you will need to install a USB serial driver on your Windows computer to allow TackTracker to talk to the devices.
Devices with a mini SD card, such as the BL-1000ST, do not need a USB serial driver installed.
The driver, if needed, can be downloaded from the TackTracker download site. (MT3329_USB_Installer.zip)
Extract the zip file to your desktop before attempting to install. Then follow the README instructions in the MT3329_USB_Installer you have extracted.
Setup your Tracker
You should now be ready to connect your device to TackTracker. (If you have not installed TackTracker yet, download and install it now. A Logged Tracking or Club Regatta License is also needed.)
- If using a serial USB device, switch ON your tracker to connect to TackTracker. (Switch the BT-Q1000XT slider switch to LOG)
- If using a device with a mini-SD card, such as the BL-1000ST, leave your tracker switched OFF when connecting to TackTracker.
- Connect the tracker to your computer using the supplied USB cable.
- Launch TackTracker and open the Track Loader
- Click "Load Tracks From GPS". TackTracker will now try to connect to your tracker. If necessary, you may need to select a COM port or drive from the list. If this step fails, reconnect your tracker and try again.
When connected, you will see the tracker manage dialog:
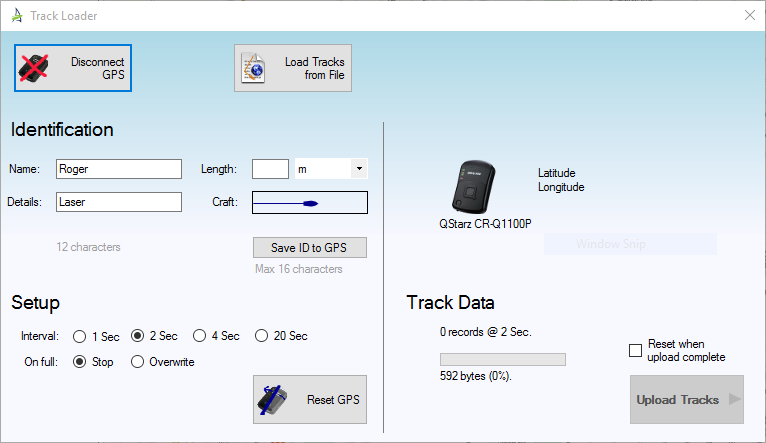
Identification
Your first step is to identify your tracker. The most important field here is the Name. This is the label that appears on the map to identify your track. Alternatively, for club trackers, you may use a numeric ID, such as "T1", which matches an identification sticker you've placed on the Tracker. The Competitor Schedule or Navigation Rally Schedule can be used to map this ID to a name.
Only a limited number of characters is available on the device to store these identification details, so it is important to keep them short. Use of special (non-latin) characters is not allowed. After entering these details, click "Save ID to GPS".
Reset
You will now need to reset your GPS to configure it correctly for TackTracker. The most important setting here is the tracking interval. For small boat sailing, 2 Sec is a good starting point. For larger boats and longer races, you may choose a longer interval. For Navigation Rally use, you should configure a 1 Sec interval.
Click "Reset GPS" and wait for the reset to complete (about 23 seconds on the serial devices, instant on the SD-card devices). Do not unplug or switch off the GPS whilst the reset is taking place. You will be told when it is safe to switch off and connect another GPS.
After the Reset is complete, you are ready to start tracking! Any Track Data you have recorded is shown on the right pane of the tracker manage dialog. Use the "Upload Tracks" button to upload those tracks to your Track Loader.
Care for your Trackers
Your trackers are robust devices, but they must be kept dry! If going near salt water, always use the supplied waterproof pouch. Dry the pouch with a towel before removing the tracker. These simple steps will ensure your trackers last a long time.
Creating Races with your loggers
See the Windows player User Guide for detailed instructions on how to use the Track Loader and Race Editor with your loggers.
This cheat sheet is a great resource to help you get started and to remind you the procedure when you only do it occassionally.